Look! We're Learning!

Early Learning. Happy Teaching.

  • Shop
  • Printables
  • Homeschool
  • Crafts
  • Parenting
  • Blog

STEM for Homeschoolers: How to Build a Toothpick Bridge with Pitsco Education!

January 3, 2017 by Selena Robinson 1 Comment

STEM education is a huge priority in our homeschool these days. We’ve got a busy middle schooler and I want her to get a good introduction to science, technology, engineering, and math during these years. That way, as she goes on in her schooling, she won’t be intimidated by these subjects later. And who knows? Maybe she’ll become an engineer herself!

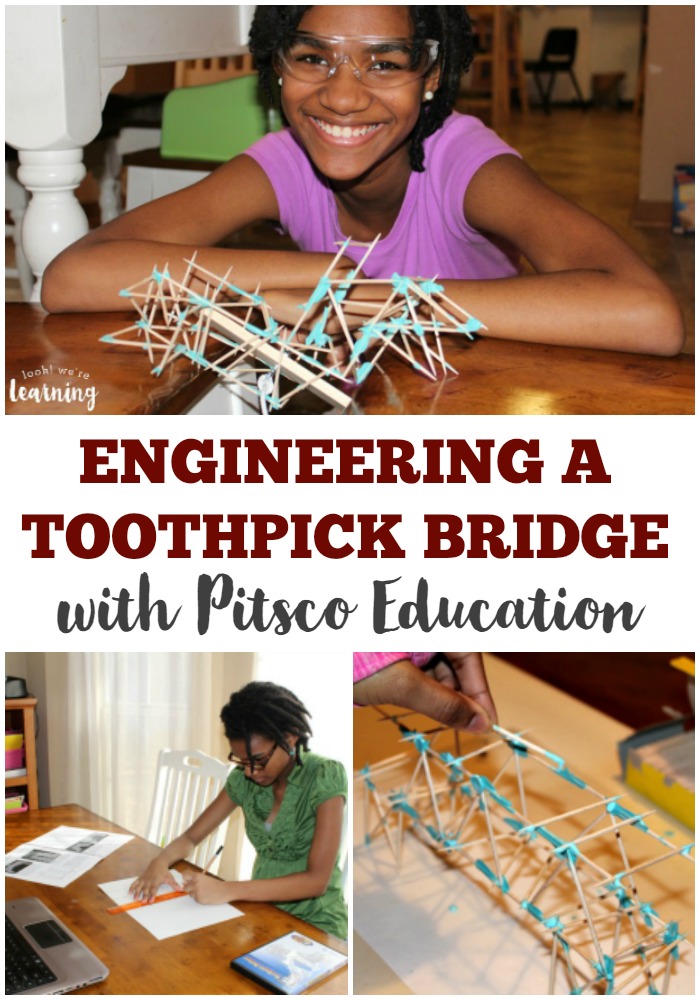
So I jumped at the chance to try the Toothpick Bridges Maker Project from Pitsco Education! See how this curriculum helps kids learn how to build a toothpick bridge and learn about design and engineering at the same time!

Disclosure: I received this product in exchange for this post. All opinions are my own and I was not required to give a positive review.

Engineering a Toothpick Bridge for Kids

Pitsco Education Toothpick Bridges Maker Project

Pitsco Education offers many, many resources for homeschoolers who want to work on STEM concepts with their kids. Each of the resources are grouped by category. For example, if you want to focus on math, you can browse plenty of awesome math projects. What I love about Pitsco’s product selection is that all of the lessons feature hands-on projects, which are an incredible teaching method for active homeschoolers (like ours).

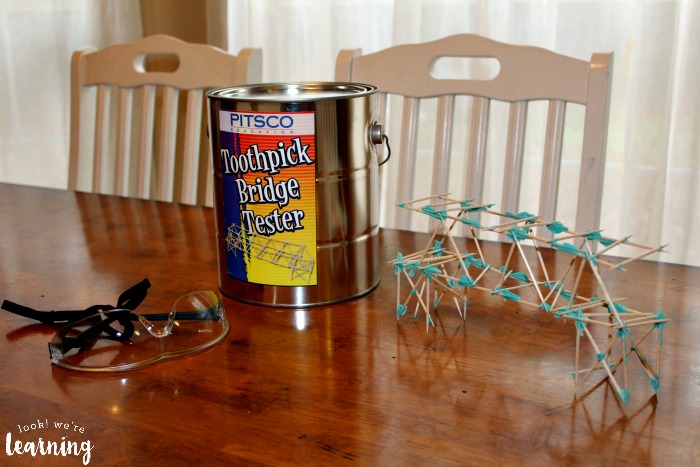
The Pitsco Education Toothpick Bridges Maker Project was the foundation for our lesson. In the kit, there are:

  • Structural glue
  • A ton of toothpicks
  • Bottles for handling the glue
  • A toothpick bridge tester
  • And an instructional video on how to design your own toothpick bridge

We also received the complete lesson plan Masterpiece Toothpick Bridges: A Guide for Teachers and Students, which was a huge help for me as the educator. The plan includes plenty of activities, research, and illustrations to make an entire month of lessons based on this concept. It’s very, very detailed and an excellent in-depth lesson we’ll be working on through the rest of the year.

How to Build a Toothpick Bridge

I was so thankful for the Toothpick Bridges DVD. It really helped my middle schooler to “see” exactly what the process is for designing and creating her bridge.

Pitsco Toothpick Bridge DVD Lesson

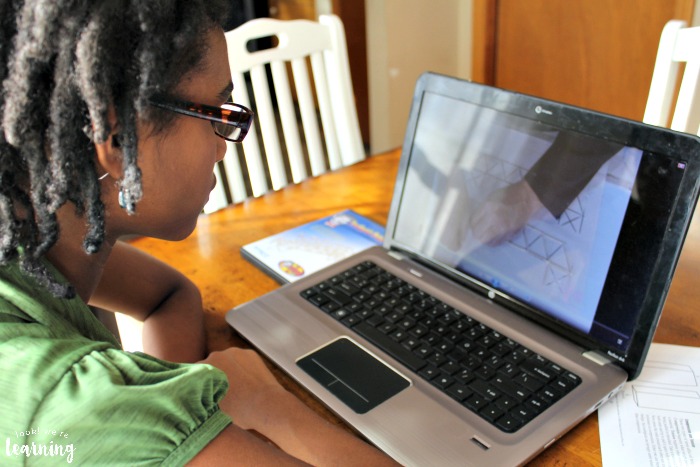
Since she has ADHD, she watched the video once and said “I got it!” As we started on the project, though, I could see that she didn’t really get it quite yet. So I played it a second time and watched it along with her, pausing frequently to ask about her understanding. That really helped her get a clearer idea of what was involved in the process.

Pitsco Toothpick Bridge Lesson Plan

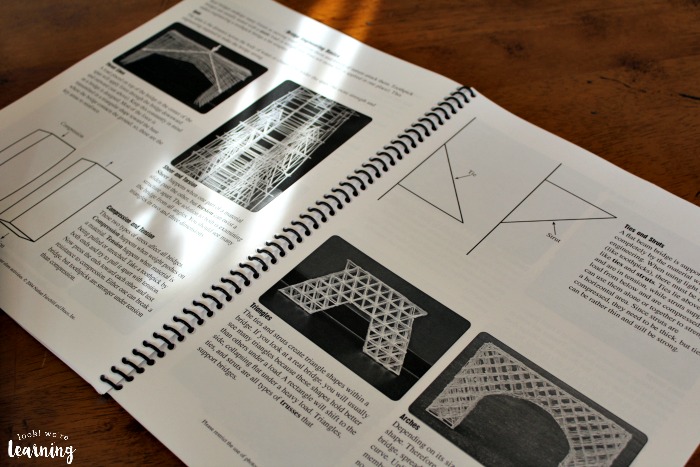
In the Toothpick Bridges teachers’ guide, there are examples of stunning toothpick bridges constructed by students. Some of these are practically works of art. This time, though, we stuck to the basics.

Drawing a Toothpick Bridge Template

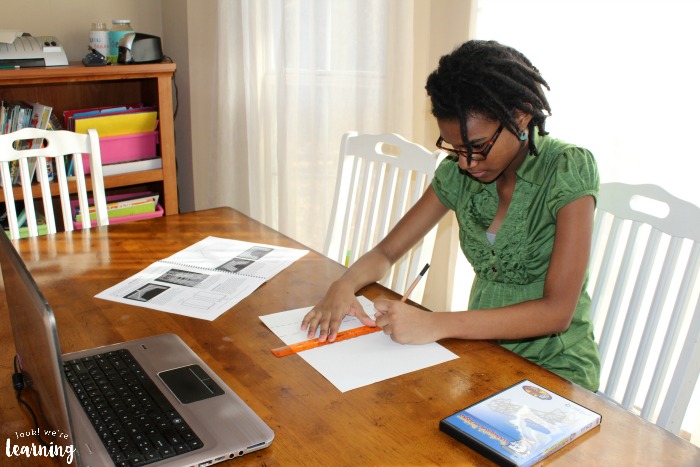
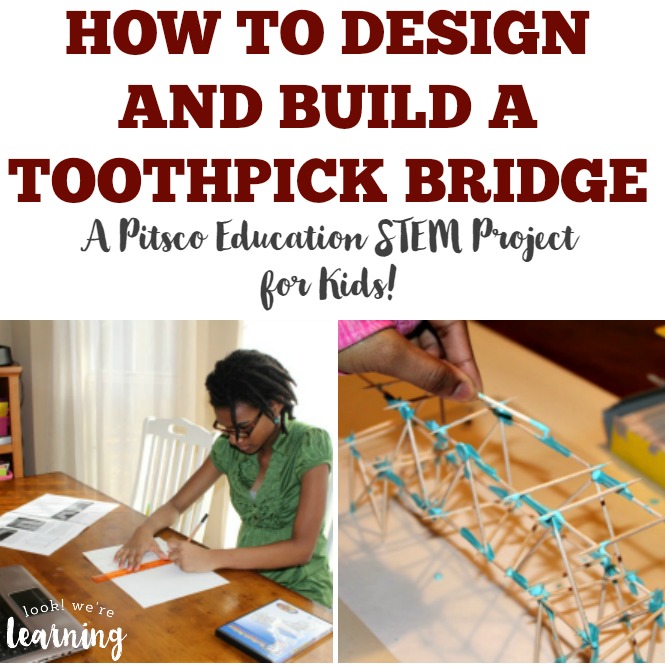
We started by creating a paper template to use as the design for our bridge sides. My middle schooler used the template on the DVD as her guide.

Designing a Toothpick Bridge

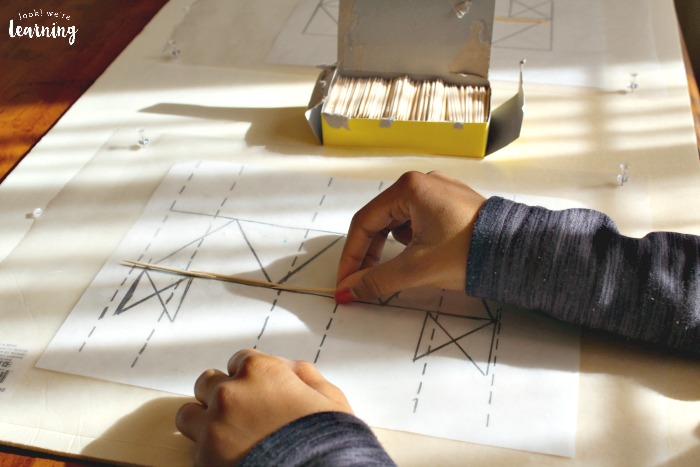
Then it was time to start measuring how many toothpicks we’d need for each side. We laid them down on the template to get a look at how to place them before we started adding glue.

Drying Toothpick Bridge Sides

As the video shows, building these bridges takes time. You can only create one side at a time and you can only construct one set of diagonals at a time. Which meant that we’d work on it for a while, let it set up, then resume working on it. For a child with a short attention span, this was an excellent activity for working on a longer-term project.

Assembling a Toothpick Bridge

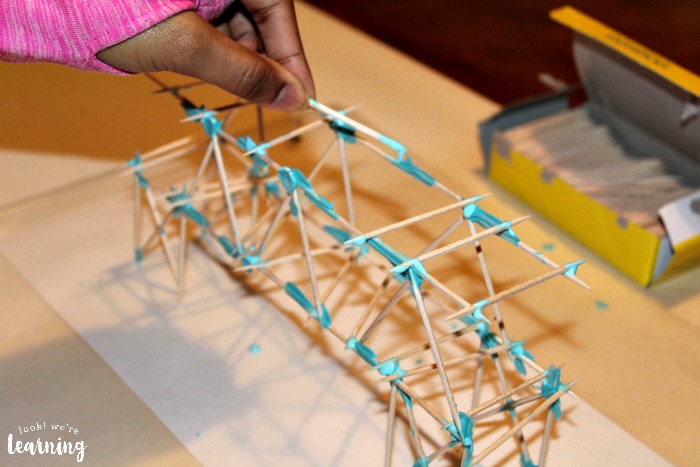
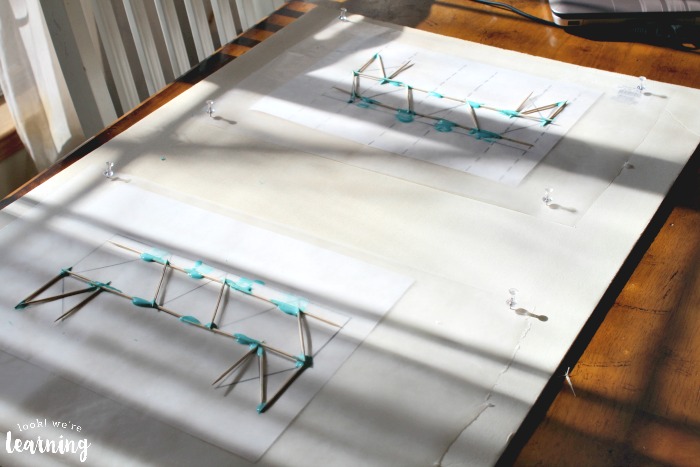
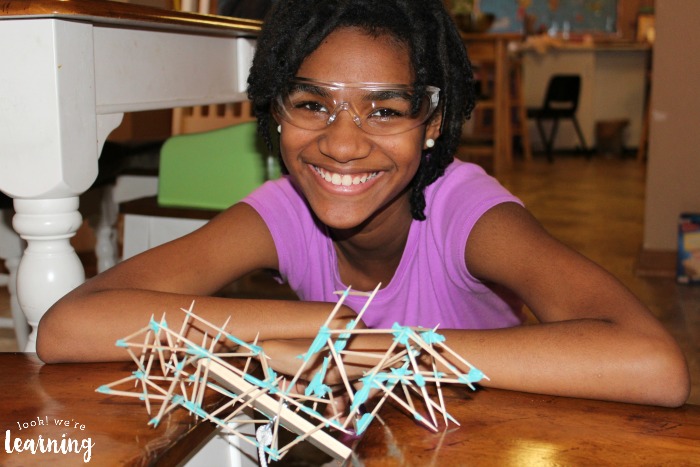
Once the individual sides dry, you can stand them up and attach them together, forming your bridge. As you can see, we used a LOT of glue. Next time, we’ll cut back on that a bit…lol.

Preparing to Test a Toothpick Bridge

Once our bridge was constructed, it was time to test it! The goal here is to put as much weight as you can possibly can on the bridge to see how much it can bear before it breaks.

Testing the Strength of a Toothpick Bridge

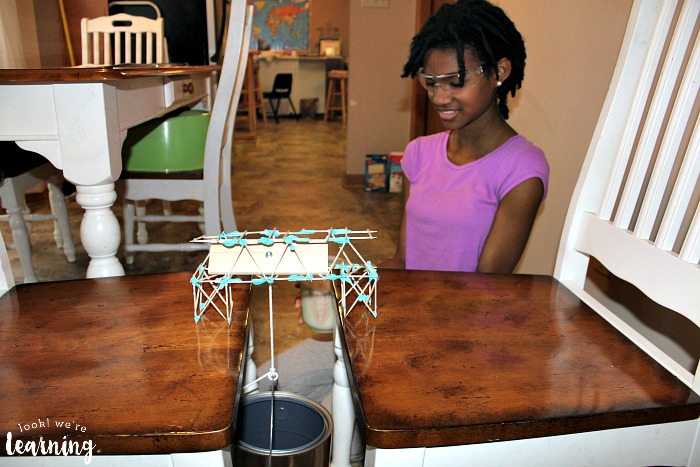
As the video showed, we put on some safety goggles first. No one wants to catch a toothpick in the eye.

We placed a piece of wood (from the Toothpick Bridge tester) on the bridge and tied the bucket to a string. Our bridge wasn’t quite wide enough for the piece of wood to lie straight down, so it’s possible that our results were a bit skewed. Next time, we’ll be sure to use the piece of wood as the template for how wide the flatbed of the bridge should be.

We gradually added sand to the bucket until…the bridge broke!

Breaking a Toothpick Bridge

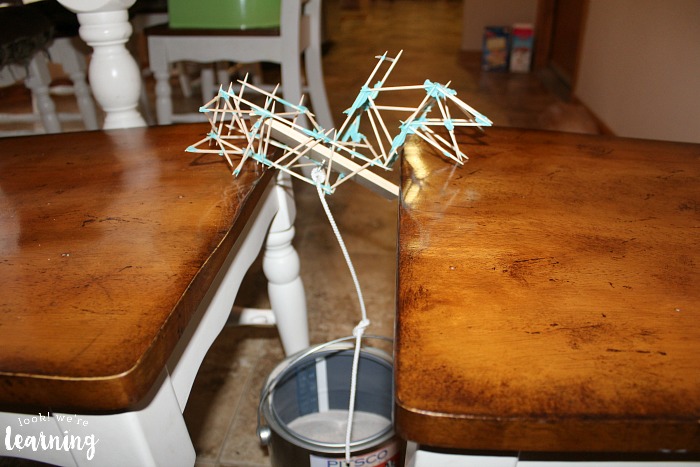
Afterward, we weighed the sand to see how much our bridge could hold before breaking. It was 6.5 pounds! Who knew you could hold up six and a half pounds with just toothpicks!

Testing the Strength of a Completed Toothpick Bridge

This was a STEM activity we truly loved. And we’ll be repeating it again this school year now that we have a better understanding of how to engineer a bridge from scratch.

How to Design and Build a Toothpick Bridge

Are you working on STEM concepts with your kids this year? Be sure to check out the incredible products available from Pitsco Education for kids!

Plus, get more ideas for teaching STEM on my STEM for Homeschoolers Pinterest board!

Filed Under: Curriculum Reviews, STEM for Homeschoolers Tagged With: curriculum reviews, engineering, engineering for kids, engineering projects for kids, pitsco, pitsco curriculum, pitsco curriculum review, pitsco education, pitsco toothpick bridge curriculum, stem, stem education, stem for homeschoolers, stem projects, stem projects for kids

Simple STEM Challenges with Hands-On Engineering!

July 29, 2015 by Selena Robinson Leave a Comment

I’ve set a few homeschooling goals this upcoming school year and one is to include more STEM learning with the kids. My biggest problem is that my passions include literature, writing, and dance – basically everything that is the opposite of STEM….lol.

So I was excited to try the book “Hands-On Engineering” from Prufrock Press! If you’re unsure how you can set up STEM learning at home, this is a great resource for simple STEM challenges!

Disclosure: I received a copy of this book in exchange for this post. All opinions are my own and I was not required to post a positive review.

Simple STEM Challenges - Look! We're Learning!

Simple STEM Challenges with Hands-On Engineering

In “Hands-On Engineering“, you get complete teacher instructions, project descriptions, internet resource links, and student activity sheets. It’s almost a no-prep solution to planning STEM activities. 🙂

Simple STEM Challenges - Look! We're Learning!

The resource is described as appropriate for grades 4-7 and I can see why. Some of the projects are fairly detailed and require a good amount of critical thinking from kids. But I decided to use it with all three of our school-age kids – just to see.

Simple STEM Challenges - Look! We're Learning!

The teacher resources are fabulous. There are diagrams, explanations, Internet links, and summaries that give you a good background of each activity.

Simple STEM Challenges - Look! We're Learning!

We settled on the Build a Catapult challenge from the book, and that involved getting an understanding of how a lever works. I drew the same diagram from the Instructor Key on the board and we talked about the essential parts of a lever.

Simple STEM Challenges - Look! We're Learning!

Then the kids sketched their own diagrams. Afterward, we used some of the internet links listed in the Teacher’s activity sheet for the catapult activity.

Simple STEM Challenges - Look! We're Learning!

We watched a video showing how ancient catapults (or “onagers”) were assembled and we talked about some of the advantages and challenges they posed for armies in battle. Then it was time for the kids to build their own catapult!

Explore Science, Technology, Engineering, Math!
Simple STEM Challenges - Look! We're Learning!

One thing I really like about “Hands-On Engineering” is that there are no detailed instructions on how to build the item in question. As a result, the kids were forced to try various methods, brainstorm ideas, and cooperate. Among the list of available supplies were rubber bands, clothespins, popsicle sticks, and plastic spoons.

Simple STEM Challenges - Look! We're Learning!

What really impressed me was that, of all three children, Pooh (our almost seven-year-old) was the first to build a working catapult!

Simple STEM Challenges - Look! We're Learning!

We rounded up all of the pennies in the house and, before I knew it, it was raining pennies from heaven…lol.

Simple STEM Challenges - Look! We're Learning!

Look at that face. That is the face of a boy who is extremely pleased with himself.

Once Pooh figured out the basic design of a catapult, the other kids made their own. But then they started hitting the chandelier in my dining room with their pennies, so they were banished to the living room. After all, engineers have to learn to work in all kinds of environments. 😉

I loved Hands-On Engineering and I’m looking forward to making more of the projects with the kids this school year! If you’d like to try to build a catapult or any of the other simple STEM challenges in “Hands-On Engineering“, check out the book for yourself!

Filed Under: 2015-16 Curriculum, Curriculum Reviews, Homeschool Curriculum, Homeschooling, STEM for Homeschoolers Tagged With: book reviews, engineering, homeschooling, stem, stem for homeschoolers

Hi! I'm Selena, a veteran teacher and homeschool mom to four. I'm so glad you're here!
About Me Contact Terms of Use Privacy Policy Places I Share
Facebook Pinterest Instagram
Homeschool Printables Unit Studies Shop the Store
Copyright ©2025, Look! We're Learning!. All Rights Reserved. Design by Pixel Me Designs